For Sale

Tuesday, December 31, 2013

Happy New Year!!

I made this New Year Baby Calendar Frames for a tea party I went to this weekend.  The baby is a punchart and the frame I picked up at Ben Franklin (HouseMart) a couple of years ago.  The frame came bare, so I had to paint it and decorate it.

Here are all four frames ready for my tea part.  I'll post more later!

Happy New Year everyone!  
May 2014 be a prosperous one for you, 
rich in health and rich in friendship.  
A little rich in the pocket helps too ;o)

Thank you for visiting our Little Paper Studio!!!

Saturday, December 28, 2013

Brown Paper Packaging

I have to confess that I didn't make this table treat.  A good friend of mine, Sandy, made these for her table treats at the retreat and I thought what genius!   One of the cutest treats and super simple.  The box is a brown jewelry type box.   She filled it with twine and strings in various colors (I'm pretty sure she shops at CraftySteals also) and tied it up with string and this tag.  Cute!  Simple!  Fast! and very usable!   And doesn't go to my hips like all the candy treats did!  Great idea, Sandy!  I might steal this for a future table treat!
Enjoy!  Karen

Tuesday, December 24, 2013

Merry Christmas!

Sorry for the bad photo.  This looked better on my phone.  You might recognize the style as I did a halloween and birthday card with washi tape this fall.   I love washi tape!    Own a ton of it and really use it (unlike a lot of other supplies I've collected).   Cardstock, ink, stamp-CTMH, Punches & bling-SU, Washi tape - assorted brands.
Enjoy!  Merry Christmas!  Karen

Sunday, December 22, 2013

Craft Fair goodies

 I thought I would post a picture of our tent at one of the past fairs.  We offer a modge podge of items to sell.

These are Hello Kitty composition books with crayons set.

Close up of one of these books.

Thursday, December 19, 2013

Sharing more swaps from retreat

Another swap we did at retreat was a vintage christmas tag swap.   The ideas were fabulous.  I used an office supply type large tag, stamped it with a chevron stamp (stamp-Michaels, ink-CTMH).  I had a bolt of muslin, so I stamped it with another Mike's background stamp in a dark taupe color and sewed it on the tag.    I found the cool vintage image of the ice skaters online, printed, matted, distressed.  Added jewels, punched snowflake and a fabric pointsettia.  Three types of ribbon complete the tag.  I was pretty happy with the results!
Enjoy!  Karen

Wednesday, December 18, 2013

Craft Season

 Hello everyone!!  My last craft fair was this past Sunday and I've pretty must just started my Christmas Shopping!!
Just a quick post showing two of the magnetic bulletin boards I made this year.

Thank you for stopping by!!!  How are YOU doing with your shopping list?

Monday, December 16, 2013

Notepad

At my retreat this month, it is tradition to make a "table treat" for all the other ladies at the retreat.  This was a big retreat (34 ladies) so it was a lot of table treats.  I made a little decorated notepad -- idea from my friend Loretta.   It's a junior size legal pad.   The big box office supply shops (Staples, etc) will cut the whole stack of pads for you for a small fee.  I then used cardstock to make a cover and decorated with cardstock, patterned paper and ribbon (CTMH).   My hexagon punch is SU.  Stamp is a little wood stamp (unknown).


Enjoy!  Karen

Tuesday, December 10, 2013

Poinsettia box

I just was a member of a 3-D object swap.  I had never done this type of swap but love the little boxes that I have received from friends.   This is my entry.   I made the poinsettia from a die from My Favorite Things (mftstamps.com) and the box die is from Stampin' Up.
Hapy Holidays!    Karen

Monday, November 18, 2013

Happy Thanksgiving!

Gobble...Gobble!
Found Mr. Turkey on Pinterest. Isn't he the cutest? Mounded him on the tea bag (or Ghirardelli candy) holder with an Action Wobble spring.

Supplies: SU 1-3/4" Circle punch (body), Small oval punch (head), Blossom punch (wattle), 2-3/8" Scallop punch (feathers), Snowflake punch (feet), Hand cut triangle (beak), wiggle eyes, Action Wobble spring.

TO EVERYONE...HAVE A WONDERFUL HAPPY THANKSGIVING!

Wednesday, November 6, 2013

Happy November

Gosh...November...Happy Thanksgiving!
Holidays are sneaking up on us, which means we need to hurry and craft accordingly! This is my 2013 Thanksgiving card. I love the Modified Shutter card, (made one for Halloween), here's another. It's super easy. You can find the instructions at SCS. Enjoy and have fun!

Sunday, November 3, 2013

Pinterest inspired -

Can you guess what I used on this card?
It's a paint chip from the local hardware store!  Today I decided to create a card from my Pinterest board.  I have accumulated so many inspirational cards and this is from one of them.  Unfortunately my textured white card base interfered with the rub-on sentiment.  Next time I'll use a stamp!!
Here's another card exactly scraplifted, except I left off the sentiment which will be included when the card is needed.

One paint chip is enough to use as the base and for your punchie.

In case your wondering ---  I only took 3 paint chips and we did buy paint :o)

Have a great one!!

Martha Stewart Butterfly Punch and Bazzil cardstock used

Wednesday, October 30, 2013

Happy Halloween!!

I received several cute Halloween goodies from some scrappy friends that I wanted to share with you:


The first one is from Karen, one of the Koolau Kroopers Club members.  I wished I asked which die she used for the basket!!


These are from Joanne, a student of mine who came to the Saturday Class.
 She said she downloaded both, printed them all on her silhoutte dye cutting machine.

Sunday, October 27, 2013

Let's Hang Out

I busted out and dusted out the ol' Cricut to use up some scraps on the table, leftovers from the Funky Dinosaur class a couple of weeks ago:

 Cartridge used:  Create a Critter.  I pretty much went through all the cartridges I owned to find a dinosaur!

 
What is your favorite cartridge to use?

Friday, October 25, 2013

More Halloween Tags

So, after I used so many of my little Halloween tidbits for the treat bags for my daughter, I decided to stamp for the treat bags for my co-workers, rather than go buy more.   I had some really cute CTMH stamps that I hadn't used.   I'm going to attach these tags to the same chevron and polka dot treat bags from Container Store that I used for my daughter's bags.  
Paper is from a Halloween stack, CTMH cardstock, stamps and ink, organza ribbon and Halloween cord (Crafty Steals I think). The banner punch is SU.     Enjoy and Happy Halloween!   Karen

Tuesday, October 22, 2013

Autumn Tea Swap --


For August's Tea Swap, the theme was Autumn and here is the card I made for my partner.  I used a retired Stampin Up set called Autumn, Hero Arts Wood Background stamp, Nestibilities Label die, Glimmer Mist and ink pads by Stampin Up.

My partner, Tanya, owns a scrapbook store called Life's Memories & More in Ware, Massachusetts (Hi!!).  If you live in the area, please say visit her store and say, Hi!!!  She sent me this beautiful card she created using Gelatos.

Additional card fronts for me:

And a Halloween diecut and tag.
If you are interested in joining our little tea swap, please contact me!!

Friday, October 18, 2013

Lotsa Treat Bags

I finished all the treat bags for my daughter last week.   Whew!  I made thirty for her to hand out to friends and co-workers.  She is going to fill the bags with candy and staple the tags on so all you see are the tags (and the bags are off to the left and right sides).   Earlier in the month, I posted one bag completed.

I found some great "be-jeweled" spider rings and halloween colored pixie sticks at Oriental Trading which I included in my care package to her.   She is going to flip!

Last weekend, I started on "MY" treat bags for my co-workers.  Since I'd used so many of my odd and ends, I decided to mostly stamp those.  I will be posting those shortly. 

Supplies - treat bags from Container Store, tags, ribbons and embellishments from my stash - many many manufacturers!

Enjoy!  Karen

Thursday, October 17, 2013

Days to Remember Class - Sneak Peak

So I am having one of those days when I just finished a project and then an "ah-ha" idea comes around and you just want to scrap the first one and improve on it!

For the Days to Remember Class, you will have two models to choose from:


or this one:

The class is October 26 from 1:30p to 3:30p at A Place in Time's new location on Liku Street.  The cost of the class is $28 and as of this date, it is sold out.  Thank you SO Much!!

Please bring the following supplies to class:

Acrylic Block for stamping (larger than a 2"x4"), make sure your name is on it
Paper Trimmer
Pencil
Scissors
Adhesive (glue and tape)
Ruler (the centering type is great for this project!)
Piercing Tool
Bone folder (opt)

Monday, October 14, 2013

Days to Remember - A Class


Here is a sneak peak of the October 26 class. Called Days to Remember, we will be creating a mini album to remember all those important celebrations as well as a pocket to hold a couple of cards. It is a perpetual calendar, it is card organizer, it is just the perfect little book created with the Everyday paper line from PaperLoft.

October 26, Saturday
1:30p to 3:30 p.m.
at A Place in Time aka The Laser Den in Kailua
Cost $28

There are only a couple spots available for the class so if you are interested, please contact me right away. Thank you!

A picture of the complete project will be up in a couple of days as well as the supply list of tools to bring so keep checking Little Paper Studio for updates!!!

This will be my last class for 2013 while I take a small break and gear up for the craft fair season.

Friday, October 11, 2013

Halloween Treats

Even in college, my daughter still loves to get little treats to hand out to her friends.  This year she is working an intership so she also wants to give treats to her co-workers.   This is the first treat bag I've made.   I got my inspiration from the cute treat bags on Pinterest.  

The orange polka dot bag is from the Container Store.  The tag is cut from some old halloween paper, skull sticker is from Mikes.   Ribon and black twine is from my stash. 

I'm sure I'll have more bags to post through-out the month as I plan to make some for my co-workers also.   Enjoy!

Karen

Monday, October 7, 2013

Happy Halloween...


It will be a Witchy Halloween! This card is the Modified Tri-Shutter; hop on over to SCS and find the instructions by Kim Score. A very awesome easy card. Dp from Flairdesignsinc (Halloween Words), and stamp from PrintWorks (Witchy Poo). Made the rosette with scrap paper and popped on Witchy Poo. Enjoy!

Saturday, October 5, 2013

World Cardmaking Day!!

Happy World Cardmaking Day!! It's a day to celebrate all of us cardmakers!!

So yesterday I decided to celebrate this occasion with co-workers. Created 60 kits of these two cards and during lunch, we invited all who wished to participate to make a card of their choice.

Card #1 uses Studio G stamps, Sizzix tag, MemoryBox Co. Cloud Die, embossed with SU Square Lattice and 2 scraps of paper.

The second card uses 3 circles for the pumpkin, a piece of green scrap for the stem, maple leave punch by EK Success, Boo! Cuttlebug die, SU Owl punch for the ghost, and googlie eyes.

There was another 3 x 3 card but I didn't take a picture.

I hope you shared World Cardmaking Day with others!!

Thursday, October 3, 2013

Halloween Postcard Swap

Deb West at Honolulu Altered Books hosted a Halloween Postcard Swap. Ok, so this was my first swap of this kind and hope my entry is at least acceptible to the other participants . . .


Supplies used: cardstock, ribbon, Magic Mesh, APT Spider Stamp, Studio G Sentiment Stamp, White Embossing powder from PaperTrey Inc., polka dot stencil template by Me, TH Distressed Ink-Vintage Photo, Homemade mixture that resemble Perfect Pearls


The back is the normal postcard design that I found and printed off from the internet.

Did you know A Place in Time makes custom stencils?? Well, I wanted a polka dot stencil and brought the idea to Bill and he made the stencil that i used on the background of my postcard!!

Tuesday, October 1, 2013

Happy Haunting

We did Halloween theme for my local swap group's swap in September.  Here is my photo.  I used CTMH stamps and inks, various halloween papers, a single rossette from rossette ribbon (American Crafts I think).     My skull is actually on a paper bag.
Enjoy!.  Karen

Sunday, September 22, 2013

Saturday, September 21, 2013

I Dig Dinosaurs - A Mini-Album Class

I Dig Dinosaurs Mini-Album Class
Saturday, September 28
1:30p to 3:30p
A Place in Time
1079 Liku Street
Cost $28.00

All ready for class and here's the sneak peak:


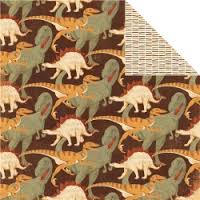
Paper line is Paper Loft Funkysaurus.


This paper-packed mini album has a base of 4 pages and can hold 19 photos, 4 wallets and 5 smaller photos (on its 5 tag mini brag booklet). You also will create 3 mini books that fit nicely inside the main album


Actually, as I look at it, it may take you longer than two hours to finish it but you can easily finish it up at home.

Please bring the following supplies to class:  Paper trimmer, Scor-Pal or other scoring device which allows scoring in 1/4 increments; scissors, pencil or pen, Eyelet setter of your choice, 3-Dimensional tape, corner rounder, both tape and glue adhesive

I have a couple spots available so please RSVP right away if you wish to join us.

Have a great weekend!!

Wednesday, September 18, 2013

Funkysaurus - Mini Album Class

Just a quick note to let you know of the upcoming mini album class scheduled for Saturday September 28 from 1:30p to 3:30 p.m.  I am still working on the album but wanted you to know that we will be using the Funkysaurus line by Paper Loft:

More specifically, this dinosaur line.

Class is $28 at A Place in Time.  
For those that have already signed up, 
I am sorry but I will be contacting some of you to make sure you will be there.

I'll post the completed album the end of this week so please stay tuned.

Thank you VERY much!!

Tuesday, September 17, 2013

Bazzill swap

I love to join the Bazzill card swaps (http://swaps.bazzillbasics.com/)   About every 6-8 weeks, they pick a new Bazzill paper line and have a swap.  You make ten cards using the selected Bazzill paper.  You are free to use any type of embellishment (Bazzill or not) and chose any style of card.   Some swaps, there is a theme (like Thank You, Birthday) and some swaps, no theme is selected.  You mail your 10 bagged cards to Bazzill, they swap them out and send you 10 in return (one will be your own).  Fun!      I can't post my card on any blog prior to the swap, so that's why I've waited until now to post.

Enjoy!  Karen

Sunday, September 15, 2013

Backpack - the tutorial


Here's the backpack tutorial!  Again, the original idea is from Mary Arima at Splitcoast Stampers.  She deserves all the credit!!  :o)  I used the BigZ Scallop Envelope and the Box 3 dies to quickly create my backpack.

You will need 3 diecuts from the Scallop Envelope die.  From the Box 3 die, you will need 2 side diecuts  and 1 bottom diecut.


Cut off the bottom of the Scallop Envelope die cut, with the scallop flaps folded and adhered towards the inside, adhere the box together.

This is a picture of the flaps adhered inwards.


This is the third diecut from the Scallop Envelope die.  Score 1/2" from the scoreline towards the flap.  Cut off the two side wings.  We will call this the lid.

This is the back of the box we previously made with 2 pieces of the Scallop Envelope die. The lid is adhered on the back of the box.

A picture of the front of the box where I am just adhering the lid.

The finished box with lid.  I sealed my box lid with velcro.

Now onto the large main portion of the backpack:
The purple paper is my pattern for the lid.  
Get your pattern here.  Deselect resizing option!!!


I have attached the box sides together and adhered one side of the bottom of the box.  I also adhered the lid to the top.  6 holes were punched to which I will set eyelets:  4 on the lid and 2 at the corners on the bottom back.

Another picture of the backpack adhered before the lid was put on.

The middle of the ribbon (24 inches) sticks out from the two eyelets closest to the scallop part of the lid. 

Knots are tied and then both ends go out the bottom eyelets and then back in from the bottom of the backpack where I will tie a knot and cutoff the excess (See picture below)

The box is then glued all together to create the larger part of the back pack.

Below is a picture of the finished bag side view.  Create the sides of your backpack by pushing in.  If you are using glue, let the glue set before forming the sides.

Now all you have to do is to decorate the bag and place velco dots.

Hope this was informative!! For more detailed information, check out Mary's link above. I didn't deviate too much from her instructions. Of course, you are also free to contact me.   If you create one using these instructions, send me a note!  I'd love to see your backpack!!

Happy Creating!