Stampin Up Climbing Orchid, and Pinewood Planks 3D embossing folder, Versamark, Copics, Wink of Stella and two little blings.
Card made for a shoebox swap. First time I used this stamp and I have had it for several months! It’s so lovely, my mom would have loved it! She loved growing and raising orchids and she loved the color purple!
Showing posts with label Copic Pens. Show all posts
Monday, June 14, 2021
Simple moments
Saturday, May 12, 2018
Monday, May 7, 2018
Copic Class with Kellie Acopan
Last month I had the opportunity to take a mini Copic class with the talented Kellie Acopan. Here are the cards I made:
Stamps and Stamps by Lawn Fawn. Fun, fun, and fun!! Thank you so much, Kellie, it was definitely fun!!
Wednesday, June 21, 2017
Stamping Class - Sneak Peek #2
For those that wish to try their hand at watercoloring the same design, bring water color pencils.
**Check out the supply list and bring your own supplies to class!
Thursday, June 11, 2015
Graduation with Sister Stamps
Hi, All! I'm back from vacation and many projects to complete.
I have several black envelopes left over from the I Dig Dinosaurs class several months ago. So all I did was
color the Sister Stamps Graduate with Copics. Add scallop mats and popped the image up over a band.
I have several black envelopes left over from the I Dig Dinosaurs class several months ago. So all I did was
color the Sister Stamps Graduate with Copics. Add scallop mats and popped the image up over a band.
The only thing that took a while here was the copic coloring
Congrats sentiment by Sizzix.
I have discovered that I should keep black envelopes in my stash!
Tuesday, April 21, 2015
Tea Swap - Fabulous Folds
Hi, Everyone! The Punch art class is scheduled for this Saturday. Please check out the supplies to bring. I edited it a little.
The theme for our March tea swap was "Fabulous Folds". I decided to put my Copic pens to work and created this card for my partner, Miyuki. She is a digi-image that I found online and fit perfectly for the then Easter season.
The card is an A2 size and folds flat into the envelope.
Here's the link to the image.
Wednesday, July 2, 2014
Half--a Card
Love this flower! It's a stamp from Be Happy, Hero Arts. I did some copic coloring and added Liquid Pearls.
So, you are probably wondering why this post is called "Half-a Card". I stamped about 4 of these flowers, colored them while watching TV and when I got back to my scrapping room, added a scallop base from Spellbinders. Then they are put in my drawer for last minute tags or cards (Not a completed card, just "half a card". Get it??). If a tag is needed, I can just punch a hole on the top and add a ribbon and maybe add a sentiment.
For this gift, no envelope is needed; just place it in clear packaging. I love the vibrancy of the flower!
So, you are probably wondering why this post is called "Half-a Card". I stamped about 4 of these flowers, colored them while watching TV and when I got back to my scrapping room, added a scallop base from Spellbinders. Then they are put in my drawer for last minute tags or cards (Not a completed card, just "half a card". Get it??). If a tag is needed, I can just punch a hole on the top and add a ribbon and maybe add a sentiment.
For this gift, no envelope is needed; just place it in clear packaging. I love the vibrancy of the flower!
Monday, January 27, 2014
Something New . . .
Hi Everyone!! A co-worker is retiring at the end of the month and I was given a Pinterest link and asked to create a Retirement Survival Kit. Not knowing what that was, I googled it. Did you know there are many Survival Kits out there? One for the mom, one for the dad, one for the "happy" married couple, one for the teacher, etc., etc.
Ok, so I had several other projects on my desk and decided to create a "simple" survival kit. The stamps, I have used several times before: Art Impressions Golden Oldies. I also took the Pinterest link and copied their wording and, when finished, it came out like this!!!
The next step was just to go to the store to pick up the kit ingredients. Wow, this turned out pretty good and was pretty fun!!!
Happy Monday!!
Thursday, January 23, 2014
What's on my desk . . .
. . . A little copic coloring. Stamped image by Art Impressions Girlfriends Dancers Set. After the picture was taken, I added some sparkly stickles on the tulles.
Aren't they cute!
Aren't they cute!
Sunday, September 15, 2013
Backpack - the tutorial
Here's the backpack tutorial! Again, the original idea is from Mary Arima at Splitcoast Stampers. She deserves all the credit!! :o) I used the BigZ Scallop Envelope and the Box 3 dies to quickly create my backpack.
You will need 3 diecuts from the Scallop Envelope die. From the Box 3 die, you will need 2 side diecuts and 1 bottom diecut.
Cut off the bottom of the Scallop Envelope die cut, with the scallop flaps folded and adhered towards the inside, adhere the box together.
This is a picture of the flaps adhered inwards.
This is the third diecut from the Scallop Envelope die. Score 1/2" from the scoreline towards the flap. Cut off the two side wings. We will call this the lid.
This is the back of the box we previously made with 2 pieces of the Scallop Envelope die. The lid is adhered on the back of the box.
A picture of the front of the box where I am just adhering the lid.
The finished box with lid. I sealed my box lid with velcro.
Now onto the large main portion of the backpack:
The purple paper is my pattern for the lid.
Get your pattern here. Deselect resizing option!!!
I have attached the box sides together and adhered one side of the bottom of the box. I also adhered the lid to the top. 6 holes were punched to which I will set eyelets: 4 on the lid and 2 at the corners on the bottom back.
Another picture of the backpack adhered before the lid was put on.
The middle of the ribbon (24 inches) sticks out from the two eyelets closest to the scallop part of the lid.
Knots are tied and then both ends go out the bottom eyelets and then back in from the bottom of the backpack where I will tie a knot and cutoff the excess (See picture below)
The box is then glued all together to create the larger part of the back pack.
Now all you have to do is to decorate the bag and place velco dots.
Hope this was informative!! For more detailed information, check out Mary's link above. I didn't deviate too much from her instructions. Of course, you are also free to contact me. If you create one using these instructions, send me a note! I'd love to see your backpack!!
Happy Creating!
Saturday, September 14, 2013
Greeting Farms - Annika
Remember the copic class I took last month? We received lots of images to practice our coloring and this pretty little school girl was one of them. I think her name is Annika from Greeting Farm. I'm feeling much better about my coloring. This thank you card is for my son's teacher with a matching backpack of goodies.
Backpack tutorial is forth coming . . . . stay tuned!!
Wednesday, September 11, 2013
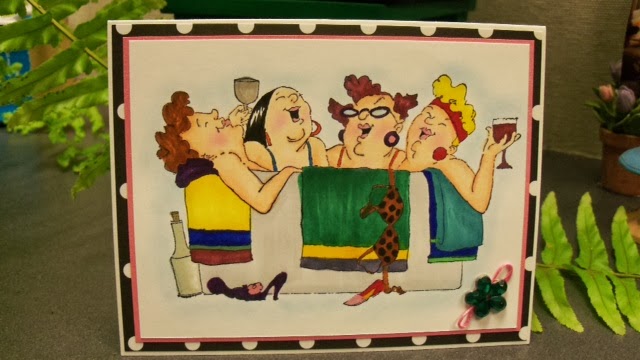
Art Impressions - Girlfriends in the Tub
Here's another Girlfriends stamped card. This one is in celebration of a girlfriend's 50th birthday!!
I'm still practicing my Copic coloring. Yuck! Don't look too closely but I should have colored the shoes in a lighter color. Eeuu!! Oh well, better coloring next time!
By the way, I'm working on a tutorial for those little backpacks I made almost a month ago so stay tuned!!
Saturday, August 24, 2013
Copic Coloring Sister Stamps
Last weekend, I also took Priscilla's Copic Coloring Class. Had a fun time at this event!! I learned alot and I think it showed in my coloring:
I think I just need some practice not coloring out of lines!! But I was very happy with my little "Ehu-haired" keiki:
Mei-Lin:
and Yoshi (normally doing the somersault), but he is doing the Kachashi (Okinawan dance) here:
I think I just need some practice not coloring out of lines!! But I was very happy with my little "Ehu-haired" keiki:
Mei-Lin:
and Yoshi (normally doing the somersault), but he is doing the Kachashi (Okinawan dance) here:
Wednesday, July 31, 2013
Norm and the Girlfriends (Golden Oldies)
Here's a card recently created but never posted made for the guy of our lunch bunch. There are four of us in our little lunch bunch and one is a guy. I used the Girlfriend stamp by Art Impressions, masked out one of the four ladies and stuck in Norm (also by Art Impressions).
The sentiment inside of the card states:
Friends never judge each other . . . everyone else, however, is fair game."
Monday, February 4, 2013
Life . . .
I couldn't wait to show you another Ai stamp! As soon as I saw AI's "Life...Bling It On", I had to have it!!!
BTW, the pattern paper on this card is actually Graphic 45 Kraft Reflections, the same paper as I did on this album. The only difference is I colored it with Copics.
The inside . . . It's a pull up card. As soon as you open the card, the surprise gift is shows.
Another card, this one a mini
The inside of the card with Basic Grey Bling it on Rubons and crystals in brown.
and the inside using the Black Basic Grey rubons/crystals.
Thank you for stopping by!!
Sunday, February 3, 2013
Ai Girlfriends
It's a birthday week at our house so I haven't done much creating. However, here is a card I created for my childhood friend who reached a milestone birthday last week.
I've been LOVING the Girlfriend series stamps by Art Impressions. This one is the Workout Set (UM3584).
The inside of the card. LOOVVEE IT!! I got two other sets. They look time consuming but surprisingly was quick to color.
Mmm... Several years ago I just LOVED Stampin Bellas. Now, I think these Girlfriends are so adorable . . . . Mmmmm. Am I showing my age??!!!!???
I've been LOVING the Girlfriend series stamps by Art Impressions. This one is the Workout Set (UM3584).
The inside of the card. LOOVVEE IT!! I got two other sets. They look time consuming but surprisingly was quick to color.
Mmm... Several years ago I just LOVED Stampin Bellas. Now, I think these Girlfriends are so adorable . . . . Mmmmm. Am I showing my age??!!!!???
Tuesday, October 2, 2012
Pretty Little Madam
This is Pretty Little Madam by Creative Companion. I've had her for almost a year and have not used her before. I'm wondering if I should use her for my tea swap this month. The tea swap theme for this month is is Sugar & Spice and Everything Nice.
Saturday, September 8, 2012
A little Sunshine
Did you check out the sale at A Place in Time? I did. I purchased a lot of Copic pens there (can't beat the price!!). Since I bought so many, I thought I would use them today to create a little Sunshine card. This is Hope from The Greeting Farm. I got it YEARS ago when I first met ManLe (from Pineapple Cove). MME Honey Cake Paper from GF Colleen (you are the best!).
The inside of the card.
I have a couple of card kits I hope to complete this weekend. So if you ordered them from me, I am sorry for the delay. Thank you for being so patient!
Subscribe to:
Posts (Atom)