

Monday, January 30, 2012
LO Share - The Girls
Really fun doing another two pages. This one used two photo collages from Walgreens. I just couldn't decide which photos to use so I used most of them. My dd and some of her best friends when she was a junior in high school. Unfortunately, all the other girls were seniors and left school. It was fun times!
 Enjoy - Karen
Sunday, January 29, 2012

Saturday, January 28, 2012
"Tropical Flair" - February 9
 How many times have you gone to the store to purchase a bag for a gift? Well, imagine making your own with a matching tag and post-it note holder!
 "Tropical Flair" is my next scheduled class. We are using Dream Weaver's quilt stencils and will create a sturdy gift bag with matching tag and a post-it note holder.
Class Date: Thursday, February 9
Time: 6:30p to 8:30p
Location: A Place in Time, Kailua
Cost: $20
Time: 6:30p to 8:30p
Location: A Place in Time, Kailua
Cost: $20
 Please bring the following supplies to class:
Scor-Pal (a must!)
Tacky glue adhesive or tape runner adhesive
paper trimmer
pencil
scissors
3-4 daubbers or 2 craft sponges
Ruler
Crop-a-dile (if you have)
**Kit design and color options may vary slightly
Tacky glue adhesive or tape runner adhesive
paper trimmer
pencil
scissors
3-4 daubbers or 2 craft sponges
Ruler
Crop-a-dile (if you have)
**Kit design and color options may vary slightly
I just took the samples on Thursday and the class is almost full. I may open a second class. Sign up today to reserve your seat!!
Friday, January 27, 2012
LO Share
I got the really cool pleated ribbon in the clearence bin at HL. I think it was like 20 cents a yard. I was thinking baby pages but it works for this one.
 Enjoy!
Karen

Karen
Thursday, January 26, 2012

Wednesday, January 25, 2012

Tuesday, January 24, 2012
Year of Cards class tomorrow - -

Here are all the sample cards you will make at my next
Year of Cards class
Year of Cards class
 A Place in Time tomorrow,
Wednesday, January 25, 6:30p to 8:30p.

 Cost is $20
Hope to see you there!
Monday, January 23, 2012
LO Share
LO share - paper is unidentified -- from a Mambi paper pack I believe. They had a pre-school "rah rah" camp to get the freshman excited about the university. As if they weren't already excited about being away from home and living on their own!
 Enjoy!
Karen

Karen
Sunday, January 22, 2012
LO Share
Another LO using photos of my dd while away at school. She assures me that she does go to class -- they only take the photos at the parties.
 Used some older Basic Grey papers and HS ghost letters. Enjoy!
Karen

Karen
Saturday, January 21, 2012
{ love } - Sneak Peak
 Another card using the Memorybox Dies. Unfortunately, this die is sold out :o(
"It's a Boy" - from Sandy
Look what I got in the mail!!
 A BEAUTIFUL ensemble from my January Tea Swap Partner, Sandra from Texas. This lady is definitely gifted and talented!!

Here is my two tea bags beautifully wrapped and personalized
 and a little candy from K&Co.
I'm the lucky one to get such a talented partner this month.
Sandy, this is just gorgeous! Thank you very much!! I just love looking at them!
Sandy, this is just gorgeous! Thank you very much!! I just love looking at them!
If you would like to join our little tea swap, ready below:
--Responsible Swappers only--
February's Tea Swap is now open!
The optional theme is: Valentine's Day; Optional Colors are: Red and Pink
Cards can be blank or with sentiments, your choice.
Requirements: Send a handmade CARD with two tea bags to your partner by the deadline.
Let me know if you would like to join the January Tea Swap by January 25
Your partner's information will be emailed to you by January 27
You will have until February 7 to mail your cards out.
Friday, January 20, 2012

LO Share
Another layout completed at my retreat. I love the banner style that is currently out.
 Enjoy!
Karen

Karen
Thursday, January 19, 2012
Celebrate Today
 "Handpainted Petites" has to be my all time favorite stamp set. This SU stamp set has been retired for several years, yet I still love it each time I use it. The card and tea holder is created for Sandy Bobo of Texas for January's Tea Swap. CTMH Floral Tapestry Paper, Diecuts from MemoryBox, Sizzix and Nestabilities.
Here is the inside of the tea holder:

I'm also sending a duplicate to Josie in Canada, "just because" :o)
Thank you for stopping by!
Thank you for stopping by!
Wednesday, January 18, 2012

Tuesday, January 17, 2012
LO Share
I finally scrapped. It seems like a really long time. Just got back from a retreat and wanted to post some layouts up. Enjoy!
 An online scrap group I'm in has an annual retreat. This was the retreat a few years back in St. Louis. We typically show up a few days early for the "scrap retreat" to tour and shop whatever city the retreat is in.
Karen

Karen
Love - Sneak peak
 Here's another card we'll be creating at my next class. I used the Memorybox dies that are brand new at A Place in Time and selling off the shelves!!
Saturday, January 14, 2012
How to make "Another Purse"
 I received several requests for the purse I did here so I created a quick tutorial.
You will need 2 pieces of paper: Paper for the bottom of the purse measuring 8.5" x 10"; and paper for the top of the purse measuring 7 1/4" x 6 1/4". Let's create the bottom of the purse first. With the 10" side at the top, score 1 1/2" and 8 1/2".

With the 8.5" side at the top, score at 3 1/2" and 5".

Cut the vertical lines up until you reach the horizontal lines. Fold and adhere into a box:


You have just completed the bottom of the purse.
Now let's work on the cover. Cut a strip of 8.5 x 1" paper for the handle. Score 1 inch at both ends.
The cover of your purse is 7 1/4" x 6 1/4". With the 6 1/4 at the top, score at 2" and 3 1/2". I rounded my corners and embossed it.

Adhere the two ends of the strip to the middle of the creases so that it is shaped like a handle.


Putting the purse together: Adhere the short side of the top of your purse onto one side of the bottom part of your purse.
 All done! Now all you have to do is add your personal touches:
 I placed a circle diecut at the front of my purse to accent:
 The purse is kept closed with velcro.
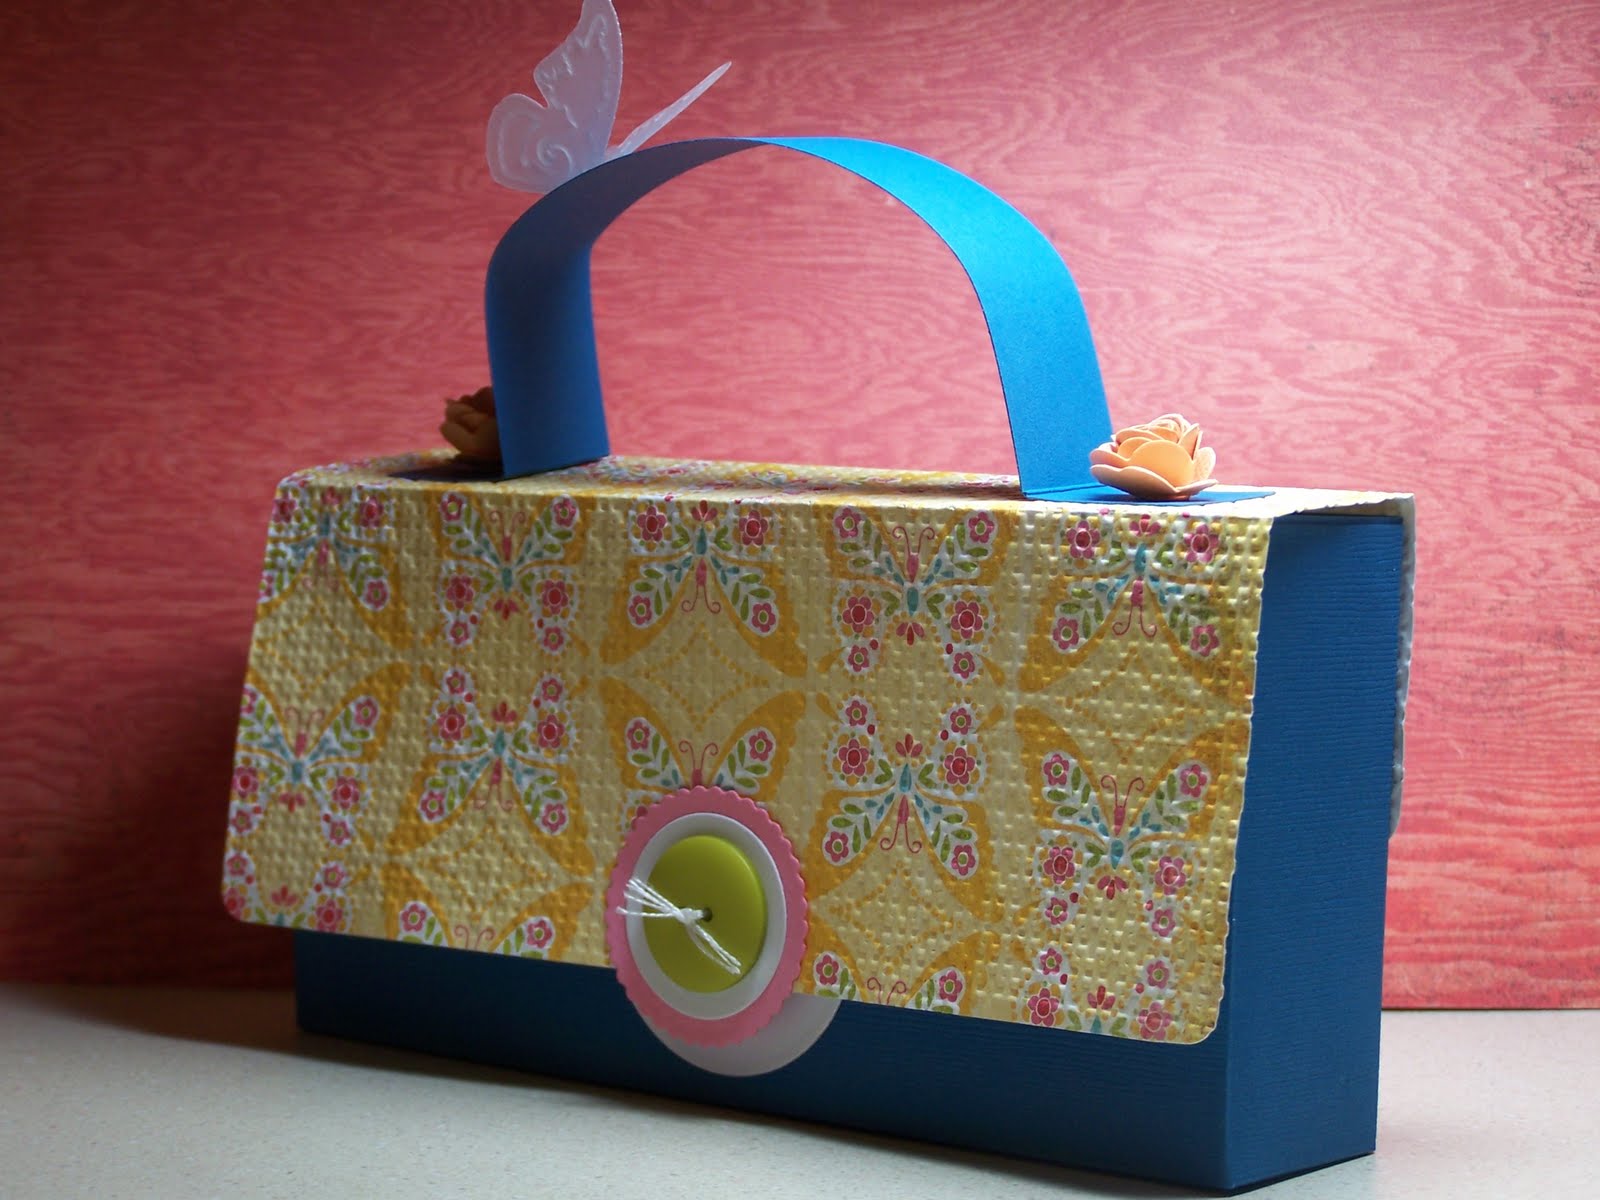
 Thank you for stopping by! My computer is back up, thanks to DH!!!!!
Thursday, January 12, 2012
"LOVE" - Year of Cards Class

Call the store now to reserve your spot! You will need to bring the following supplies to class:
Paper trimmer, scissors, pencil, adhesive tape or glue; 150 Xyron sticker maker or any type of glue pen/glue stick; piercing tool, ScorPal or thither scoring tool, Tweezers, Tim Holtz Applicator tool or sponge and White Opal Liquid Pearl (if you have).
On a side note: I believe we caught another virus on our computer so I'm doing the virus scan, etc. Only thing is it takes almost half a day to clean it out! Hence I'm blogging through my ipad.
Friday, January 6, 2012
The simplest, easiest gift card holder
 I learned how to make the the simplest, easiest gift card ever from my friend Sherri and I'm sharing it with you!
 Here is my template.
 Start with a 5 1/4 x 6 in paper. You can make 4 holders from a 12 x 12 piece of paper. With the 5 1/4 side up, score 3/4" from both ends. With the 6" side up, score at 1 1/4 and 3 3/4.
 Cut the 3/4 score lines off, leaving the middle panel uncut. Do the same thing on the other side. Now cut tabs from the 3/4" scored middle panel (See the picture above.)
 Fold in the tabs and then the smaller panel. Adhere.Cut a 3/4" x 6" for the band. (You can use the left over paper or choose a coordinating color). Decorate. (I reused the reindeer that Dori made.)
All done!! Didn't I saw it is the simplest and easiest gift card holder!!! :o)

Here's a birthday one I used with left over paper from another project.
All I did was round the straight edge corners. In fact, I'm going back to round the edge of the reindeer one. I think it looks much better with it rounded. You can also use a decorative corner rounder.
All I did was round the straight edge corners. In fact, I'm going back to round the edge of the reindeer one. I think it looks much better with it rounded. You can also use a decorative corner rounder.
Make yours today and please send me a picture!
Subscribe to:
Posts (Atom)